
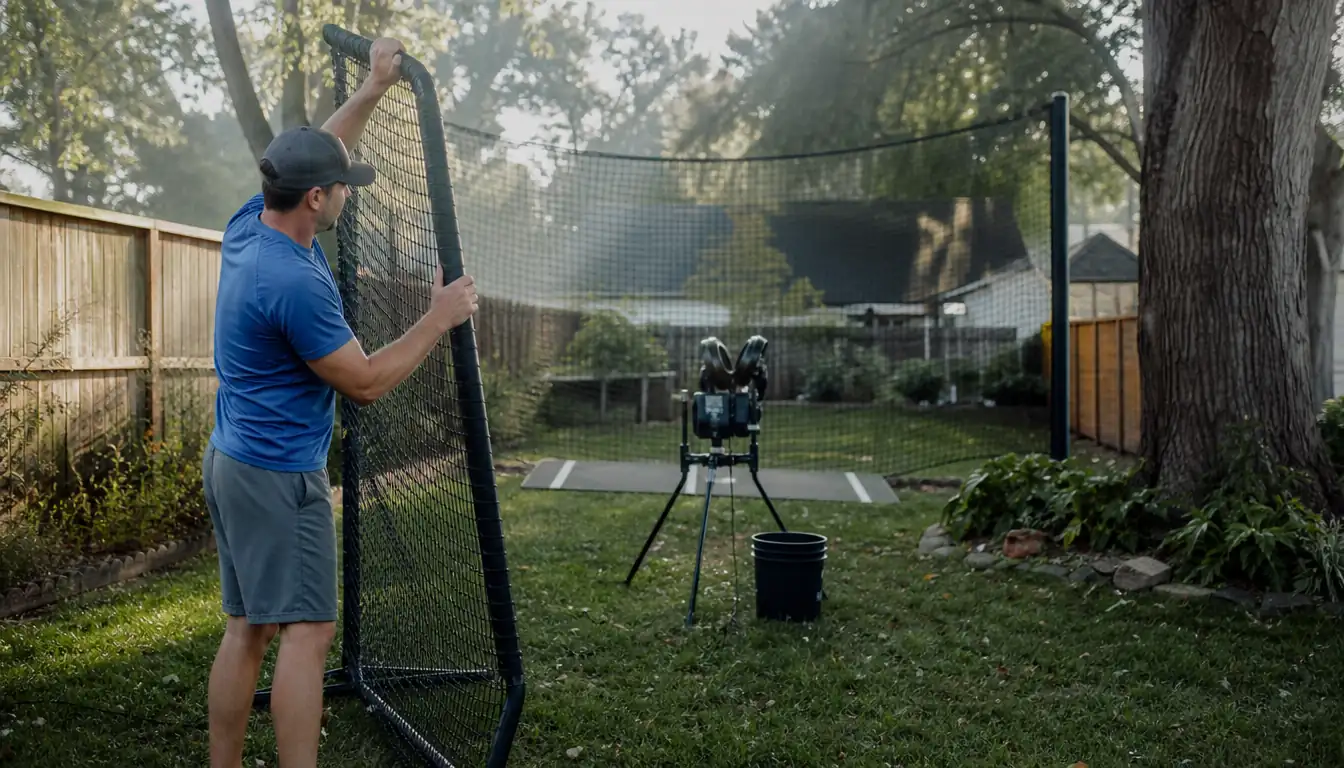
My arm gave out on batting practice before my son's did. That's the honest reason I bought a pitching machine. I was flipping underhand tosses to him in the driveway three nights a week, and by week four my shoulder was barking and his swings still weren't getting anything close to game speed. A machine fixes the speed problem fast. What it doesn't fix on its own is the fact that you're now running a device that fires a hard ball at 40 to 50 mph in a space that also has your kid, maybe a sibling chasing the dog, and a garage door twenty feet away.
I set up the Louisville Slugger Blue Flame in my own backyard for two seasons, and most of what follows came from doing it wrong the first time and right every time after. This isn't a liability document. It's the same walk-through I'd give a neighbor if they borrowed mine: where to put it, how to net it, where the cord goes, and who stands where before a single ball feeds through the wheel.
The machine that made my BP sessions repeatable instead of random
The Blue Flame is light enough to carry in one trip from the garage, runs on a standard outlet, and throws a consistent enough pitch that my son could actually train his timing instead of guessing where my next lob was going.
Amazon Check Today's Price on Amazon →Step 1: Scout Your Space Before You Assemble Anything
Before I ever pulled the machine out of the box, I walked my backyard with a tape measure. You need a flat, level stretch of ground with nothing overhead, no low branches, no gutter line, no basketball hoop arm hanging into the flight path. My yard slopes slightly toward the fence, so I moved the whole setup to the one dead-level patch near the shed instead of fighting the grade.
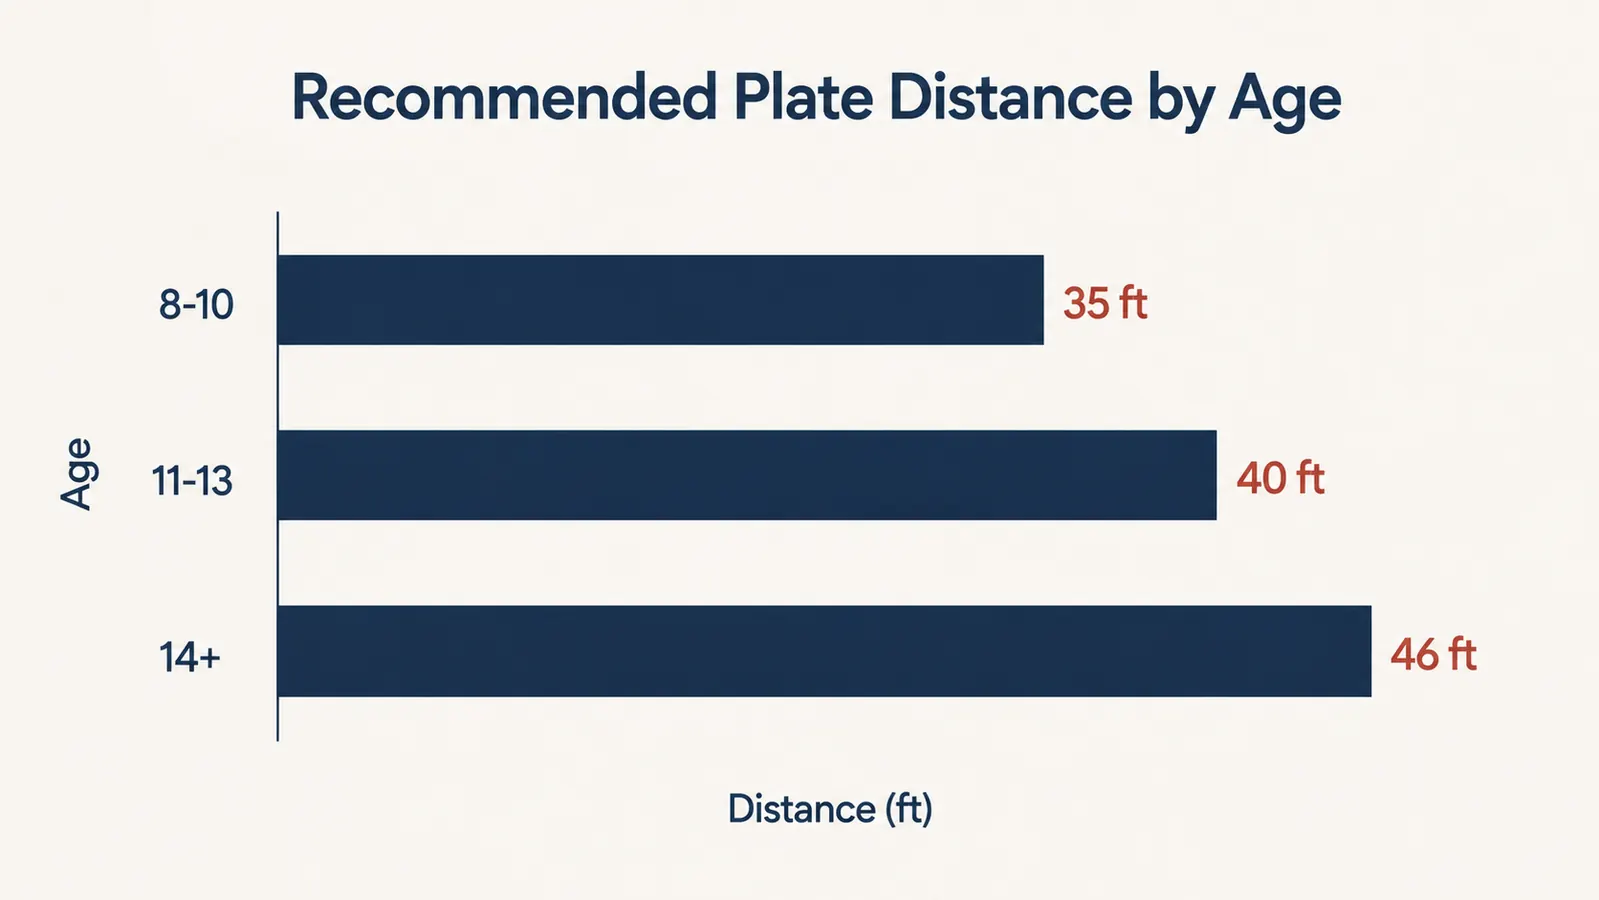
Distance matters more than people think. For my son at 12, using a standard 11-inch ball, I ran the machine at 40 feet from the plate, which gave him a reaction window close to what he'd see from a 46-foot mound at that age without the ball arriving too hot for a backyard setting. For his younger sister at 9, we pulled it in closer to 35 feet at a lower speed setting. If your player is 14 or up and you're using this for real velocity training, you're looking at closer to 46 feet, and at that range the margin for error behind the plate needs to be bigger, not smaller.
I also checked what's directly behind the batter. A missed or deflected ball travels. My backstop faces our fence line, not a window, not a car, not a spot where my neighbor's kids ride bikes. If your only flat space points toward glass or a street, that's the wrong spot regardless of how good the netting is.
One more thing I check every single time, not just the first time: who might wander into the space mid-session. My neighbor's dog jumps our fence on occasion, and my daughter has cut through the yard on a scooter more than once without looking. Scouting the space isn't a one-time task you do before assembly and forget. It's the first five minutes of every session, checking that the same lane is still clear.
Step 2: Build a Real Backstop, Not a Suggestion of One
I used a 7-foot L-screen in front of the machine, on the feeder's side, and a full net strung between two 10-foot poles behind the plate. The L-screen isn't optional decoration. It's there so the person loading balls into the hopper has something solid between their body and a foul-tipped comeback. I feed from behind and to the left of the screen, never directly behind the machine's wheel housing, and never standing in the open lane between the wheel and the plate.
Behind the batter, I run net panels rated for baseballs, not the cheap garden mesh some big-box stores sell for 'backyard sports.' A ball moving 40+ mph will punch through thin mesh netting and keep going. I anchor the poles with sandbags on the base plates because a fence-mounted setup that's only zip-tied to a chain-link fence will sag and eventually tear loose mid-session.
Side netting matters too if you've got any foul territory that opens toward a driveway or a neighbor's yard. I added two shorter side panels after a mishit line drive skipped past my original two-panel setup and rolled into the street. Cheap fix, and it should've been there from day one.
I also inspect the netting itself before every season, not just once when I buy it. UV exposure and lawn sprinklers break down cheap mesh faster than you'd think, and a net with a fist-sized hole in it isn't doing its job anymore. Ten minutes walking the panel line looking for frayed spots or gaps at the pole seams beats finding the hole because a ball went through it.
Step 3: Anchor the Machine and Level the Wheel
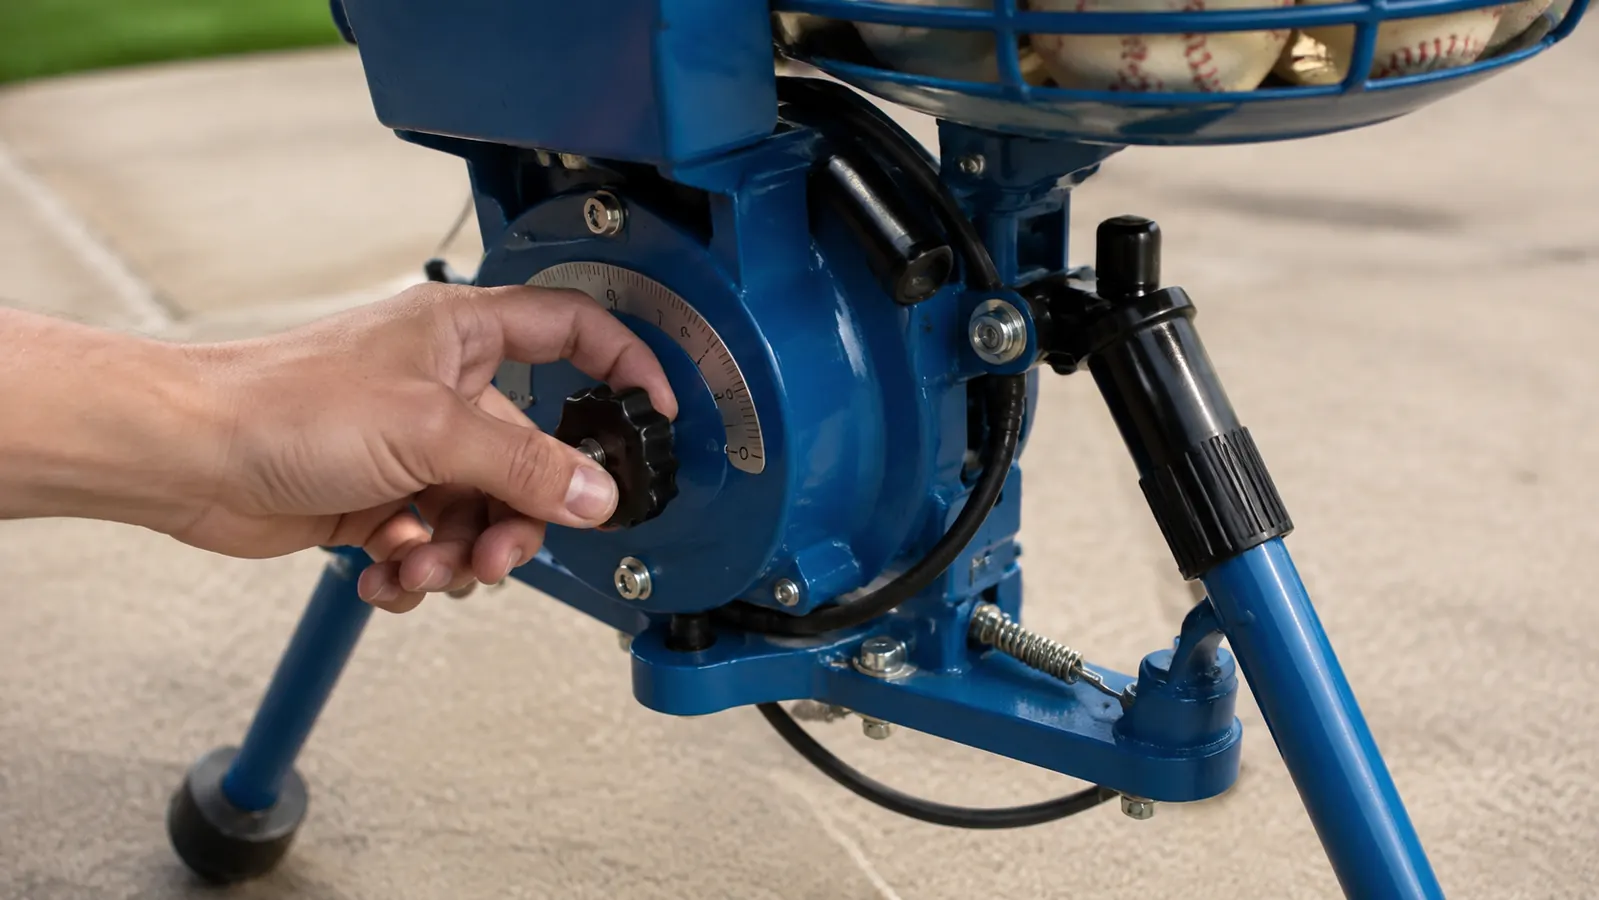
The Louisville Slugger Blue Flame sits on a folding leg base with adjustable feet. On concrete or a paver patio, I just set it and check that all three feet are making contact, no rocking. On grass or a slightly uneven patch of yard, I dig each foot in a half inch until the housing sits level, because a machine that's tilted even a little will send pitches drifting left or right instead of down the middle, and that drift shows up as a wild pitch nobody was braced for.
I keep the ball hopper on the same side as my feeding hand so I'm not reaching across the wheel housing to grab the next ball. That one habit alone cuts down on hands getting anywhere near the spinning wheel. Before every session, I do a hand check with the machine unplugged: reach where I'll actually be feeding from, confirm nothing requires my fingers to cross in front of the wheel opening.
When the hopper runs low, I unplug the machine to refill it, every time, even though it only takes a few seconds longer than doing it live. It's the same logic as turning off a lawnmower before you clear a jam. The machine doesn't need to be running for you to load balls into it, so there's no reason to leave it powered while your hands are near the feed opening.
Step 4: Route the Power Cord Like You Mean It
The Louisville Slugger Blue Flame runs on a standard household outlet, which means most backyard setups need an extension cord, and that cord is its own hazard if you treat it casually. I run a 12-gauge outdoor-rated cord from a GFCI outlet on my back porch, never a bare indoor cord dragged through wet grass. If your only outlet isn't GFCI-protected, that's worth fixing before you plug anything in outside.
The cord path matters as much as the outlet. Mine runs along the fence line, away from the batter's box, away from the feeder's stance, and away from the spot where my daughter cuts through to get to the trampoline. I tape it down at the porch step with gaffer tape so it's not a trip line in the one spot everyone actually walks. And every time I adjust the speed dial or clear a jammed ball, I unplug the machine first. It takes ten seconds and it means my hands are never near a live wheel.
I also check the cord itself for wear before every season it comes back out of the garage. A cracked jacket or exposed wire near the plug end means that cord gets replaced, not taped over. And I never leave the cord run out on wet grass overnight between sessions. It comes back inside, coiled, the same day I use it.
Step 5: Dial In Speed and Set the Rules Before the First Pitch
I always start at the lowest speed setting and feed five or six balls into the empty net with nobody in the batter's box, just to confirm the pitch is going where I expect and the machine isn't drifting after the level check. Only once that's dialed in does anyone step in to hit.
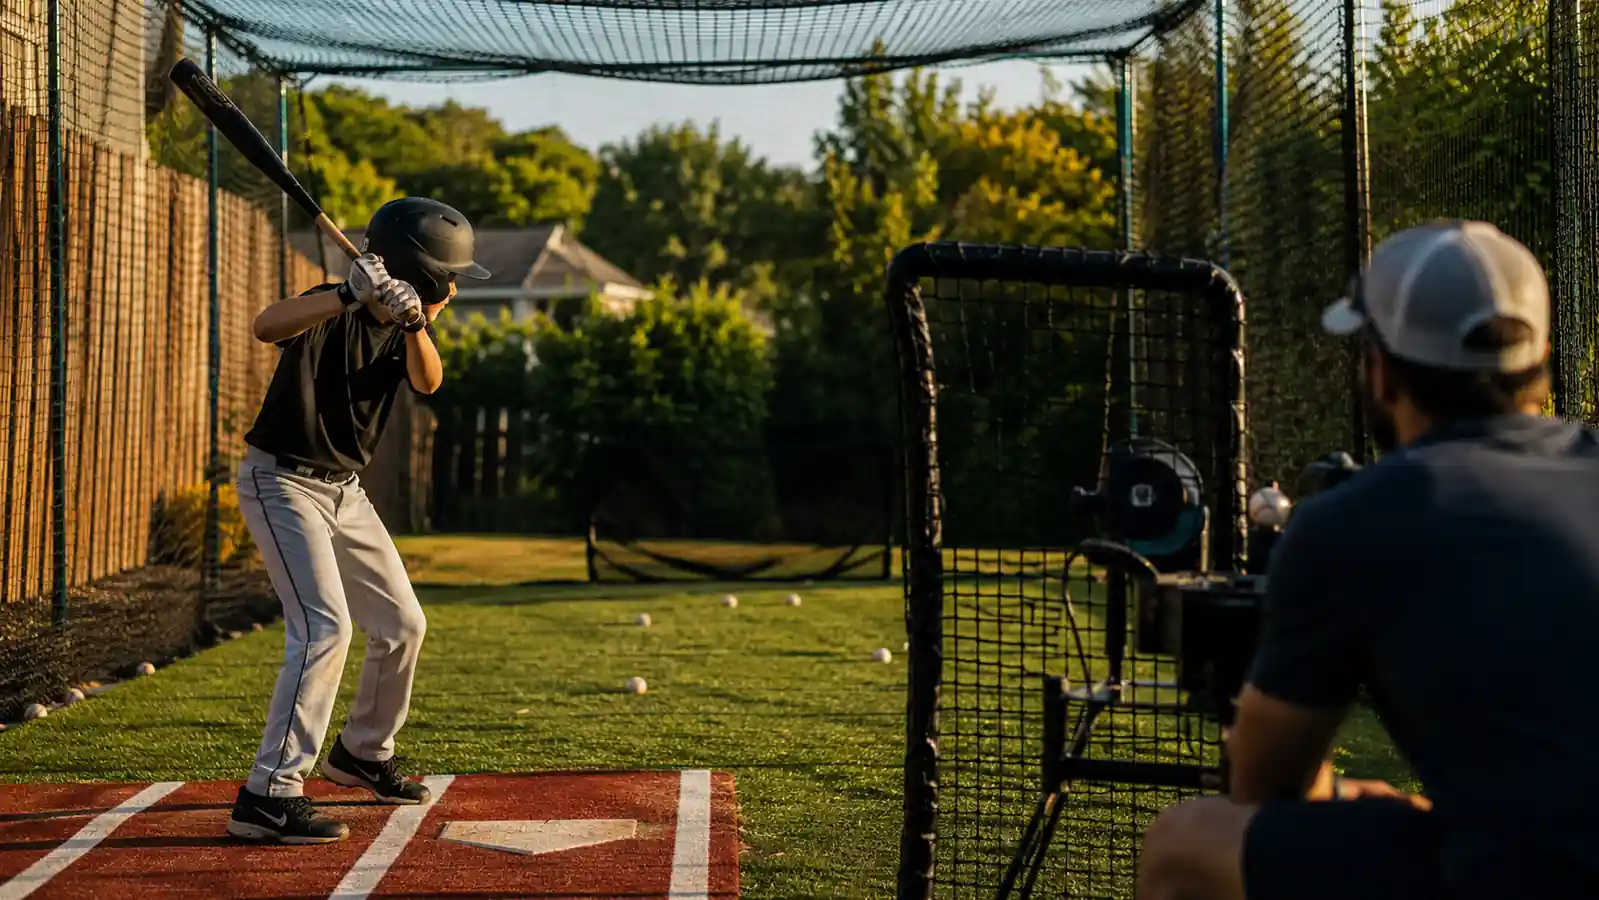
Then we set positions out loud, every single time, even though my kids have heard it a hundred times: batter wears a helmet and stands deep enough in the box that a mistimed pitch isn't arriving on top of them before they can react. Feeder stays behind the L-screen, to the side, never in the direct lane. Anyone not hitting or feeding stands well back, off to the side, outside the netting, not behind the machine and not behind the batter where a foul tip could reach them. My rule with my own kids: if you're not hitting or feeding, you're behind the fence line, full stop, no exceptions for 'just watching for a second.'
We also call out every pitch before it's fed, a plain 'ready' from the feeder and a nod back from the batter, so nobody's stepping into the box while a ball is already loaded and nobody's feeding a pitch to a batter who's still adjusting a glove or tying a shoe. It's a small habit that costs two seconds and removes almost all the surprise from the setup.
The machine doesn't know who's paying attention. That part is still on you, every single session, not just the first one.
What Else Helps
A couple of small additions made our setup meaningfully safer without much cost. A rubber batting tee mat under the plate kept the batter's footing consistent instead of digging a hole in the grass over a season, which matters more than it sounds like for keeping a kid balanced and not lunging out of the box chasing a pitch. A cheap pair of work gloves for whoever's feeding the hopper saves your hands from ball rash after a long session, and it's one less reason to get careless about hand placement near the wheel. If you've got two kids using the same setup at different ages, keep a written speed setting taped near the dial for each one, so nobody's guessing or bumping it up 'to see what happens' when a parent isn't standing right there.
Weather changes the equation too. Wet grass makes the base feel less stable and makes footing near the plate slicker for the batter, so I don't run sessions after rain until the ground has firmed back up. Wind is the other one people skip past. A gusty day can push a light plastic L-screen enough to shift its position mid-session, so I check that it's still square to the feeder before every few pitches on a windy afternoon rather than assuming it stayed put.
Set it up once, run it safely every time after
The Blue Flame folds down small enough to store in a garage corner between sessions, and once you've got your distance, netting, and cord routine locked in, setup after that first time takes about five minutes.
Amazon Check Today's Price on Amazon →